Monday 30 April 2012

Scrapbooking all sweet memories

Ive always admire those who can do so much with papers . Scrapbooking is also one of the things i would love to be apart of. unfortunately, at where i live it is very hard to get the tools i need. My Dream Finally came true when i saw the First proper Scrapbooking Store opened in my hometown , Smidapapers ! fell in love with the shop , it was love at first site. 

cover page of my album
Is just so sad to see it moved. from its original location and now i could only rely on online craft blogs to get my goods. but thats not going to stop me from creating beautiful things. i believe  could just make anything out of ... Anything? lol i recycle some of the papers from used wrapping papers and cards....

here are some of the scrapbooking ive done. It took me a while to do it as u know im a fulltime housewife and a mother. so I don really have the privilege to seat down quietly to do them.So, that is why they are precious to me, this are some of the ones i spend my precious free time doing. hope you will like it as much i do.

married on the 31.12.2010


sweet moments


where we first met. Basketball court lol.

Is my may of keeping all the beautiful memories and smiles. SMiles that will never fade away =)

Monday 23 April 2012

Time files , there goes a weekend. a fair week i should say. nothing extra ordinary. Just to share with you something ive done a few months ago. My bestie's Birthday, Jasmine. As i have mention. Love to find reasons to wrap practically anything up. 

Is my Dearest Friend birthday give definitely Would spend more time with it. However it dint take long. i love simple yet meaningful ways to wrap ,im never the type that would spend whole afternoon cracking my head. im more towards going with the flow. let my imagination run wild. 

But as for this, i called it "Sealed With love " using all raw materials. Brown paper recycle from previous letter envelops and A wax sealed stamp (which is my new toy, Bought from Groupon ) love it. It definitely din cost much for the wrapping but yet 100% sentimental and Sincere. 

Blessed Birthday , Miss Jasmine

Sweet teddy Guarding the parcel

"sealed with love" to my dearest Friend.
Love,Elsie. 

Tuesday 17 April 2012

Cute Clay Charms


Its was back then where i needed to rest at home waiting for my little one to arrive i did this cute little charms inspired by my fav soft toy "little chick bee" using a type of soft clay called I clay. it was very easy to use and air dries. its very addictive too. i would spend whole day making different charms and little cupcakes. those wonderful times are just unforgettable. .. 

my panda collection minus the piggy one lol

random little ones

cupcake/mushroom looking charms ~

just looking at them just brightens up my day. i hope it puts a smile on your face too .have  fun crafting =)

Friday 13 April 2012

Wrap with love

*All Wrap Up*
Ive always have a thing for wrapping gifts! I would always find a reason to wrap something! so was happy that one of my dear friend's Birthday is Near. went shoping for her gift and found a lovely cupcake recipe book that comes with a Very nice metal box. i thought is such a waste to wrap it up but at the same time feels is lack of some personal touch to it if its not wrap up. So i decided to Wrap it with pretty Bows ! still able to see the pretty box and yet with a touch of love.

simple yet beautiful.

is really simple and does not take up much time. here is the tutorial is u like to try it out yourself. 

things u need
here are the list of things u need.
1. organza ribbons (2 types of colours) 
ive chosen red and gold that matches the gift box

2. scissors 
3.thread
4.gold paint
5. paint brush
6.pine corns (ive picked them during my stay at Bukit Tinggi , finally put it into good use Lol)
7. ruler

thats pratically all u need. simple right ? =)

1.First Measure The ribbons length by simply trying it on the box enough to wrap all around the box. make sure 2 of them are equal length.

step2.then twist it over the box. here is the video on how to do it, u can watch this video http://www.youtube.com/watch?v=ScT15x33v3Y
(i learnt it from her too) and have a clear picture of how to do step 2 till step 6. below are the pictures on how I do it. Hope it helps

step 3.after tying the not.be sure to leave some ends for the next step.

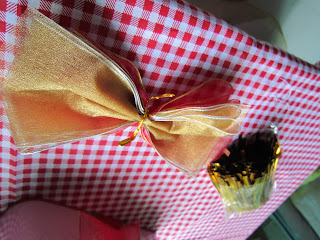
step4. starting to work on the bows.

step 5. twist it together 

step 6.

step 7.

I added a touch of my own twist to it and painted the pine corns with  gold paint and left it dry (it takes about 15 minutes or so ) 

step 8. 
Twist a thread around the pine corn and and tie a knot. then Tie them on the bow where u can hide the thread. (as shown in the picture)

final product
And Tadaaa... all done. Have fun wrapping !....


Greetings~

Hello There,

Its been a while now since my last attempt to blog. Always Wanted to have a place where i could share my interested in Crafts and all beautiful things. Unfortunately i never did make the move due to the busy lifestyle ( now that im a mother of a 10 month old daughter ). 

Then i came a across this Quote 

" If you dont go after what you want,You Will never have it
If u never ask, the Answer is always No.

If you Dont Step forward,
You are always at the same place"

It kinda woke me up. And thats when ive decided to Give it a try. To reach my dreams. To Create And hopefully to be appreciated.Who knows Some day, my dream of owning my very own one of a kind Boutique will come true....

Love,Elsie.